No Bake Cheesecake Recipe Thats Simple And Delicious
This no bake cheesecake recipe has saved me more times than I can count. No water bath. No cracked top. No standing over the oven hoping for the best. What you get instead is a filling that’s thick, tangy, and perfectly creamy — set firm enough to slice clean, with a buttery graham cracker crust that holds its shape all the way to the last bite. I tested this four times to get it right, and I’ll tell you exactly what went wrong each time so you don’t have to repeat my mistakes. This one is genuinely foolproof once you know the rules.
How to Make No-Bake Cheesecake (Quick Answer)
Beat fully room-temperature cream cheese with powdered sugar and sour cream until completely smooth. Fold in whipped heavy cream, pour into a chilled graham cracker crust, and refrigerate for at least six hours or overnight. The filling sets without any gelatin or baking — the whipped cream does all the structural work.
Why You Will Love This No-Bake Cheesecake Recipe
First, there’s no oven involved. That alone makes this worth keeping in your back pocket for summer, for potlucks, or for any night when you want dessert without heating up the whole kitchen. Because the filling is whipped rather than baked, the texture is lighter than a New York-style cheesecake — still rich, but with a mousse-like quality that makes it dangerously easy to eat two slices.
Additionally, this recipe is genuinely forgiving once you understand the two non-negotiables — room temperature cream cheese and enough chill time. Everything else is flexible. You can top it with fresh strawberries, a blueberry compote, lemon curd, or just eat it plain. The base recipe works every time, and it scales easily if you need to feed a crowd.
That said, the sour cream is the secret weapon here. Most no-bake cheesecake recipes skip it. However, adding just a quarter cup makes the filling tangier and helps it set noticeably firmer. I added it on my second test and never went back.
Ingredients You Will Need
Here’s everything that goes into this no bake cheesecake recipe. Nothing unusual — just standard grocery store ingredients that work together in a very specific way.
For the crust:
-
- 2 cups graham cracker crumbs (about 14 full sheets)
-
- 1/3 cup granulated sugar
-
- 6 tablespoons unsalted butter, melted
-
- Pinch of salt
For the filling:
-
- 24 oz (3 blocks) full-fat cream cheese, fully at room temperature
-
- 1 cup powdered sugar, sifted
-
- 1/4 cup sour cream, room temperature
-
- 2 teaspoons pure vanilla extract
-
- 1 tablespoon fresh lemon juice
-
- 1 1/2 cups heavy whipping cream, cold
Optional toppings:
-
- Fresh strawberries, blueberries, or raspberries
-
- Whipped cream for serving
-
- Lemon curd or caramel sauce
How to Make No-Bake Cheesecake Step by Step
Working through this recipe in the right order matters more than you’d think. Therefore, read through the full method before you start. The filling comes together fast once the cream cheese is ready — so having everything prepped in advance saves you from scrambling.
Step 1: Make the Graham Cracker Crust
Combine the graham cracker crumbs, sugar, salt, and melted butter in a bowl. Stir until the mixture looks like wet sand and clumps when you squeeze it. Next, press it firmly into the bottom of a 9-inch springform pan. This is where most people stop — don’t. Press the crust up the sides of the pan at least one inch. That extra inch gives your slices defined, restaurant-looking edges that hold together when you cut them.
Use the flat bottom of a measuring cup to compact the base, then use your fingers or a small spoon to push and pack the sides. The crust needs to be dense and even. A loose, crumbly crust will fall apart when you release the springform, and there’s no fixing that once the filling is in. Refrigerate the crust for at least 20 minutes while you make the filling.
Step 2: Beat the Cream Cheese Until Completely Smooth
This is the step I got wrong on my very first batch. My cream cheese was still cold in the center — I’d pulled it out of the fridge maybe 30 minutes before I started. As a result, the filling had tiny lumps I couldn’t beat out, and the texture was grainy instead of silky. Cream cheese needs to be genuinely room temperature — that means two full hours on the counter, not 30 minutes.
Once your cream cheese is truly soft, beat it on medium-high speed for two minutes using a hand or stand mixer. It should look fluffy and completely smooth before you add anything else. Then add the sifted powdered sugar, sour cream, vanilla, and lemon juice. Beat again on medium until fully combined, stopping to scrape down the sides of the bowl. The mixture should be thick, smooth, and slightly glossy.
Step 3: Whip the Heavy Cream and Fold It In
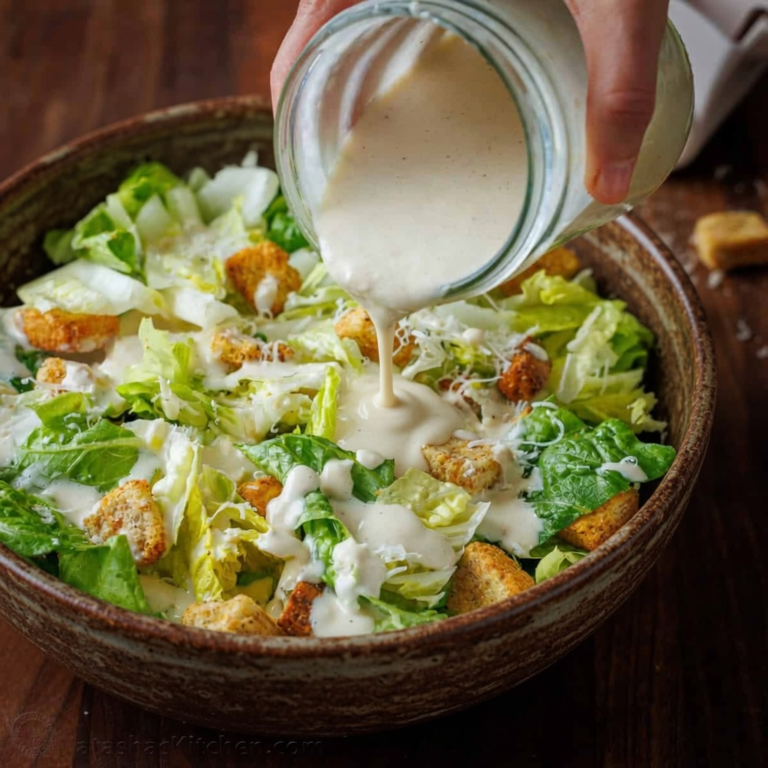
In a separate cold bowl, whip the heavy cream to stiff peaks. This is the structural element of the whole recipe — the whipped cream is what makes the filling hold its shape without any baking or gelatin. According to Serious Eats, cold cream whips faster and holds its peaks longer, so keep it in the fridge until the very last second.
Fold the whipped cream into the cream cheese mixture in three additions. Use a rubber spatula and a gentle hand. Folding — not stirring — keeps all the air you just whipped in. That air is what gives the filling its light, mousse-like texture. If you stir aggressively, you’ll deflate it and end up with something dense and flat. Take your time here.
Step 4: Fill, Smooth, and Chill
Pour the filling into your chilled crust and spread it into an even layer with an offset spatula or the back of a spoon. Smooth the top as flat as you can — it sets exactly as you leave it, so what goes in is what comes out. Cover the pan tightly with plastic wrap and refrigerate for a minimum of six hours. Overnight is better. Eight to twelve hours gives you the firmest, cleanest slices.
The doneness test I use every time: tilt the pan to a 45-degree angle. If the filling doesn’t move, it’s set. If it ripples or slides, it needs more time. Don’t rush this part. A cheesecake that’s pulled too early will slump the moment you release the springform.
Pro Tips for Perfect No-Bake Cheesecake
After four rounds of testing this no bake cheesecake recipe, these are the details that actually made a difference — not just nice-to-haves, but things that changed the outcome.
- Full-fat cream cheese only. Low-fat or whipped cream cheese has too much water and won’t set properly. Stick with the full-fat blocks.
- Don’t skip the sour cream. It adds tang and helps the filling set firmer. A quarter cup is enough — you won’t taste it distinctly, but you’ll notice what happens when it’s missing.
- Sift the powdered sugar. Unsifted powdered sugar clumps. Those clumps don’t fully incorporate and show up as tiny white lumps in the final filling.
- Use a springform pan. There’s no clean way to slice a no-bake cheesecake from a regular cake pan. The springform release is not optional.
- Chill your mixing bowl before whipping cream. A cold bowl speeds up the process and helps the cream hold its peaks once it’s folded into the filling.
- Run a hot knife under warm water before slicing. Dry the blade, then cut. Repeat between each slice. This is the difference between a clean edge and a smeared one.
Frequently Asked Questions
Why won’t my no-bake cheesecake set?
The two most common causes: cream cheese that wasn’t fully room temperature, or not enough chill time. Cold cream cheese doesn’t fully incorporate and leaves the filling loose. Additionally, if you’re in a warm kitchen, give it the full twelve hours rather than six. The tilt test — 45 degrees, no movement — is your most reliable indicator.
Can I make this no bake cheesecake recipe ahead of time?
Yes, and it actually improves with time. Make it the night before and let it chill overnight. The filling firms up more completely with a longer rest. It keeps well in the fridge for up to four days, tightly covered.
Can I freeze no-bake cheesecake?
You can. Wrap the whole pan in plastic wrap and then a layer of foil, and freeze for up to one month. Thaw overnight in the refrigerator — not on the counter, or the texture gets watery. The crust softens slightly after freezing but still tastes great.
Do I need gelatin to make no-bake cheesecake set?
Not with this method. The combination of full-fat cream cheese, sour cream, and stiffly whipped heavy cream provides enough structure without gelatin. However, if you’re in a very warm climate or you know your fridge runs warm, you can bloom one teaspoon of unflavored gelatin in two tablespoons of cold water, melt it gently, and fold it in with the whipped cream for extra insurance.
What’s the difference between a baked and no-bake cheesecake?
Texture, primarily. Baked cheesecake — like a classic New York style — is denser, with a firmer, almost custard-like crumb. According to Wikipedia, cheesecake has been made in various forms since ancient Greece, but the no-bake version relies on whipped cream for structure instead of eggs and heat. As a result, it’s lighter and creamier — closer to a mousse than a traditional cheesecake.
What to Serve with No-Bake Cheesecake
This dessert is rich on its own, so pair it with something that cuts through or complements the creaminess. Here are a few directions worth considering:
- Fresh berry compote. Simmer blueberries or strawberries with a little sugar and lemon juice until jammy. Spoon it over each slice right before serving. The acidity balances the richness of the filling.
- Salted caramel sauce. Drizzle it over the top of the whole cheesecake before slicing. The salt cuts the sweetness in a way that makes the whole thing taste more complex.
- Lemon curd. Spread a thin layer over the top of the chilled cheesecake before serving. It adds a bright, citrusy contrast that works especially well in spring and summer.
- A dinner that ends on a high note. If you’re building a full menu, this cheesecake pairs beautifully after something indulgent. Try it after Marry Me Pasta for a date night that doesn’t require much active cooking time in the kitchen on the day of.
- After a crowd-pleasing main. Planning a dinner party? Serve it after Chicken Tikka Masala — the spiced, creamy main and the cool, tangy cheesecake hit completely different notes and make for a genuinely memorable meal.
Once you nail this no bake cheesecake recipe, it becomes the thing people specifically request at gatherings. It looks impressive. It slices clean. It tastes like you spent more time than you did. Keep it in your back pocket — you’ll reach for it more than you expect.

No-Bake Cheesecake Recipe
Ingredients
Method
- Make the graham cracker crust: Combine the graham cracker crumbs, granulated sugar, salt, and melted butter in a bowl. Stir until the mixture looks like wet sand and clumps when you squeeze it.
- Press the crust firmly into the bottom of a 9-inch springform pan, then press it up the sides at least one inch. Use the flat bottom of a measuring cup to compact the base, then use your fingers or a small spoon to pack the sides evenly. The crust should be dense and even throughout.
- Transfer the crust to the refrigerator and chill while you prepare the filling — at least 15 minutes.
- Beat the room temperature cream cheese in a large bowl with a hand mixer or stand mixer on medium-high speed until completely smooth and fluffy, about 2 to 3 minutes. Scrape down the sides of the bowl as needed.
- Add the sifted powdered sugar and beat on medium speed until fully incorporated and smooth. Then add the sour cream, vanilla extract, and fresh lemon juice. Beat until the mixture is uniform and creamy with no lumps.
- In a separate cold bowl, whip the cold heavy whipping cream on high speed until stiff peaks form. Do not under-whip — the stiff peaks are what give the cheesecake its structure.
- Gently fold the whipped cream into the cream cheese mixture in two or three additions, using a rubber spatula. Use slow, sweeping motions to preserve the air in the whipped cream. Fold just until no white streaks remain.
- Pour the filling into the chilled crust and spread it into an even layer with a spatula. Smooth the top as much as possible.
- Cover the springform pan loosely with plastic wrap and refrigerate for at least 6 hours, or overnight for best results. Do not try to slice it early — it needs the full chill time to set firm enough to hold clean slices.
- When ready to serve, run a thin knife around the inside edge of the springform pan, then release and remove the outer ring. Top with fresh berries, whipped cream, lemon curd, or caramel sauce if desired. Slice and serve cold.